1.Spring5底层原理之BeanFactory与ApplicationContext
BeanFactory与ApplicationContext
BeanFactory和ApplicationContext的关系是怎么样的呢?我们可以看类图。

ApplicationContext是BeanFactory的子接口,它扩展了BeanFactory的功能。
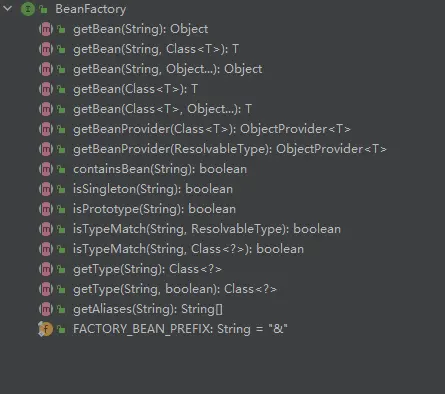
BeanFactory

BeanFactory的主要功能就是获取Bean。
例子
创建一个SpringBoot项目,启动类中SpringApplication.run()方法,返回的就是ApplicationContext的子类ConfigurableApplicationContext。
@SpringBootApplication
public class SpringSourceApplication {

    public static void main(String[] args){
        ConfigurableApplicationContext context = SpringApplication.run(SpringSourceApplication.class, args);
    }
}
我们再断点看看context对象中的内容

我们可以看到有BeanFactory的实例,实现类是DefaultListableBeanFactory,然后看DefaultListableBeanFactory的类图

类图还是比较复杂的,现在我们从我们比较熟悉的单例Bean看起来,我们找到DefaultSingletonBeanRegistry,双击进入到DefaultSingletonBeanRegistry类中的源码去看看。
public class DefaultSingletonBeanRegistry extends SimpleAliasRegistry implements SingletonBeanRegistry {

    // 省略其他代码
	/** Cache of singleton objects: bean name to bean instance. */
    /** 单例对象的缓存:bean的名称与bean的实例 */
	private final Map<String, Object> singletonObjects = new ConcurrentHashMap<>(256);

    // 省略其他代码
}
singletonObjects就是缓存所有单例对象的。
我们创建两个类分别为
@Component
public class Component1 {
    private static final Logger log = LoggerFactory.getLogger(Component1.class);
}
@Component
public class Component2 {
    private static final Logger log = LoggerFactory.getLogger(Component2.class);
}
断点启动项目,在context中找到beanFactory的singletonObjects字段,展开可以看到

我们自己的类也被加载到spring容器中进行管理了。
我们还可以通过反射拿到singletonObjects,代码如下:
@SpringBootApplication
public class SpringSourceApplication {

    public static void main(String[] args) throws NoSuchFieldException, IllegalAccessException {
        ConfigurableApplicationContext context = SpringApplication.run(SpringSourceApplication.class, args);


        Field singletonObjects = DefaultSingletonBeanRegistry.class.getDeclaredField("singletonObjects");
        singletonObjects.setAccessible(true);
        ConfigurableListableBeanFactory beanFactory = context.getBeanFactory();
        Map<String, Object> map = (Map<String, Object>) singletonObjects.get(beanFactory);

        map.forEach((k, v) -> {
            if (k.startsWith("component"))
                System.out.println(k + " - " + v);
        });
    }
}
输出如下:
component1 - com.zhaojun.springsource.Component1@2d760326
component2 - com.zhaojun.springsource.Component2@9e54c59
ApplicationContext
下面的类图中我们可以看到,ApplicationContext接口除了继承了两个BeanFactory接口外,还继承了四个接口,分别是EnvironmentCapable,MessageSource, ApplicationEventPublisher, ResourcePatternResolver

这几个接口都是对BeanFactory的功能扩展。
EnvironmentCapable:读取环境信息
MessageSource:处理国际化资源
ResourcePatternResolver:通配符匹配资源,如:磁盘路径,类路径匹配资源
ApplicationEventPublisher:发布事件对象
ApplicationContext功能一:国际化
我们在resources文件夹下分别建立几个properties文件,名称如下图:

messages.properties:一般配置一些语言通用的语言配置
messages_en.properties:以_en结尾,配置的是英文的配置
hi=hello
messages_zh.properties:以_zh结尾,配置的是中文的配置
hi=你好
当然还可以配置其他国家的,只要messages_后面跟不同国家语言的简写就好了,比如日文是 _ja
在context中,我们可以读取到messages中配置的信息
System.out.println(context.getMessage("hi", null, Locale.CHINA));
System.out.println(context.getMessage("hi", null, Locale.ENGLISH));
输出如下:
你好
hello
若控制台出现中文乱码,应该是idea中properties文件的编码设置问题,可以按照下图修改一下配置,然后重新把properties中的中文输入一遍就好了
ApplicationContext功能二:通配符获取资源
获取classpath下的资源
Resource resource = context.getResource("classpath:application.yml");
输出如下
class path resource [application.yml]
获取jar包下的资源,需要在classpath后面加*号,获取jar包中的资源
Resource[] resources = context.getResources("classpath*:META-INF/spring.factories");

for (Resource res : resources) {
    System.out.println(res);
}
输出如下
URL [jar:file:/D:/repository/org/springframework/boot/spring-boot/2.6.4/spring-boot-2.6.4.jar!/META-INF/spring.factories]
URL [jar:file:/D:/repository/org/springframework/boot/spring-boot-autoconfigure/2.6.4/spring-boot-autoconfigure-2.6.4.jar!/META-INF/spring.factories]
URL [jar:file:/D:/repository/org/springframework/spring-beans/5.3.16/spring-beans-5.3.16.jar!/META-INF/spring.factories]
获取path路径下的资源
Resource[] pathResources = context.getResources("path:D:\\IDEAWorkSpace\\spring-source\\src\\main\\java\\com\\zhaojun\\springsource\\Component1.java");

for (Resource res : resources) {
    System.out.println(res);
}
输出如下:
ServletContext resource [/path:D:/IDEAWorkSpace/spring-source/src/main/java/com/zhaojun/springsource/Component1.java]
ApplicationContext功能三:获取环境信息
获取系统环境信息
String javaHome = context.getEnvironment().getProperty("java_home");
System.out.println(javaHome);
输出如下
C:\Program Files\Java\jdk1.8.0_121
获取项目中application.yml中的信息
String port = context.getEnvironment().getProperty("server.port");
System.out.println(port);
输出如下
8080
ApplicationContext功能四:发布事件对象
为了测试这个功能,首先我们要创建一个事件注册的类,这个类要继承ApplicationEvent类
public class UserRegisteredEvent extends ApplicationEvent {
    public UserRegisteredEvent(Object source) {
        super(source);
    }
}
例如在Component1中有个注册方法,注册成功后需要发送邮件,可以通过事件通知进行解耦,Component2中接受到事件后进行发送邮件。
@Component
public class Component1 {
    private static final Logger log = LoggerFactory.getLogger(Component1.class);

    @Autowired
    private ApplicationEventPublisher context;

    public void registered(){
        log.debug("用户注册");
        context.publishEvent(new UserRegisteredEvent(this));
    }
}
@Component
public class Component2 {
    private static final Logger log = LoggerFactory.getLogger(Component2.class);

    @EventListener
    public void sendMessage(UserRegisteredEvent event){
        log.debug("发送邮件,{}",event);
    }
}
我们来测试一下,早启动类中,创建Component1的实例,并调用registered方法
context.getBean(Component1.class).registered();
输出如下
2022-03-30 13:00:10.712 DEBUG 68832 --- [           main] com.zhaojun.springsource.Component1      : 用户注册
2022-03-30 13:00:10.726 DEBUG 68832 --- [           main] com.zhaojun.springsource.Component2      : 发送邮件,com.zhaojun.springsource.UserRegisteredEvent[source=com.zhaojun.springsource.Component1@6749fe50]
总结
本篇文章主要介绍了BeanFactory与ApplicationContext的关系,其实ApplicationContext是BeanFactory的子接口,它扩展了BeanFactory的功能。还讲了一些ApplicationContext的功能。
感谢黑马程序员分享的视频https://www.bilibili.com/video/BV1P44y1N7QG
